


Robot lawn mowers are designed to operate reliably throughout the growing season, but winter poses very different challenges. Across much of Europe, colder temperatures, higher humidity, frequent rainfall and periods of frost can all have a negative impact on mechanical components, batteries and electronic systems if a mower is left unprepared. Proper winter maintenance is therefore not just about storage – it is about protecting long-term performance, safety and service life.
This step-by-step guide explains how to correctly prepare, maintain and store a robotic lawn mower during the winter months using proven, manufacturer-aligned practices. It also provides a balanced assessment of when professional servicing may be beneficial and when careful DIY maintenance is usually sufficient. The aim is to help homeowners take informed, practical action based on real-world European conditions.
When Should a Robot Lawn Mower Start for Winterization?
Determining the right moment to stop regular operation is the first and most important step in successful winter maintenance. Shutting down too early and too late are bad for your lawn and mower. Here are some tips to help you determine when the time starts for robot mower winterization:
1. Grass Growth as the Main Reference Point (not calendar dates)
The clearest indicator is a visible and sustained slowdown in grass growth. When the lawn no longer requires regular cutting for several weeks in a row, this usually reflects soil temperatures dropping below the active growth threshold. Grass growth is therefore a more reliable guide than the time of year.
2. Temperature, Frost and Soil Conditions
Repeated overnight frosts, consistently low daytime temperatures and increasingly waterlogged soil all signal that operating conditions are deteriorating. Running a robotic mower on frozen or saturated ground increases wear on drive systems and can damage turf structure.
3. Differences Across European Climate Zones
Because European winters vary widely, from mild maritime climates to colder continental regions, local weather patterns should always take priority over regional averages when deciding when to begin winter shutdown.
Step-by-Step Winter Maintenance Process
After determining the right time to stop your robotic lawn mower, it is important to follow a clear winter maintenance sequence.
Step 1 – Tool Preparation: What You Need for Proper Winterization
Before starting winter maintenance, gather the necessary tools to ensure the process is safe and efficient.
Essential Tools:
- Soft cleaning brush
- Microfibre cloths
- Protective gloves
- Screwdrivers / hex keys (for blade removal)
- Non-corrosive cleaning agent
- Contact-point cleaning spray
Optional Tools:
- Torque screwdriver (for precise blade fastening)
- Anti-corrosion spray
- Low-temperature bearing grease
- Battery voltage tester
Safety Notes:
- Avoid high-pressure water
- Do not use aggressive solvents
- Do not use metal wire brushes
Tip: Having all tools ready before starting maintenance saves time and reduces errors during cleaning, inspection, and storage.
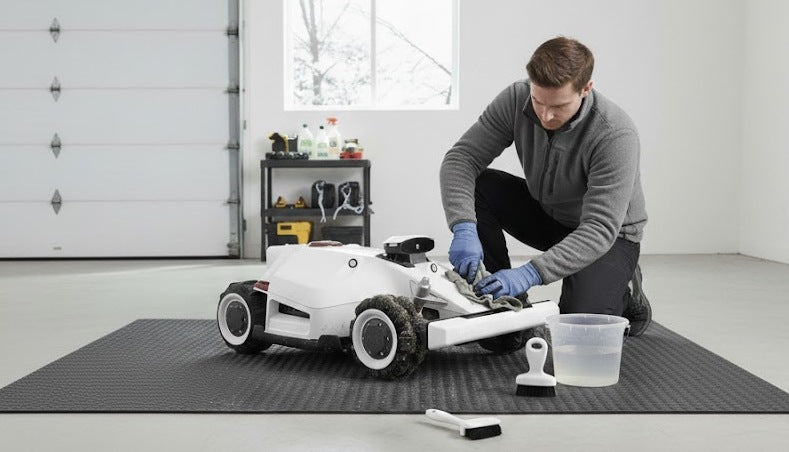
Step 2 – Thorough External and Underside Cleaning of Robot Mower
Proper cleaning protects the mower’s mechanical components, electronics, and sensors from corrosion and wear during storage.
Preparation Before Cleaning:
- Switch off and isolate the mower from power
- Place it on a stable, flat surface for safe access to the underside
Cleaning Robot Mower Steps:
- Wheels and wheel housings: use a soft brush to remove grass, mud, and debris, ensuring smooth rotation and preventing rust
- Blade area / cutting disc: carefully remove clippings and dirt with a soft brush or cloth; inspect for rust or damage
- Sensors and safety components: gently wipe with a microfiber cloth to maintain correct operation
- Chassis of mower: use a soft brush and a low-pressure washer or garden hose to clean the bottom of the robot mower
- Charging contacts: clean with a contact-point spray or a dry cloth to ensure a reliable electrical connection
Safety Tips:
- Never use high-pressure water
- Wear gloves when handling blades
- Ensure the mower is fully dry before storage
Tip: Thorough cleaning now reduces maintenance issues and ensures smooth startup in spring.
Step 3 – Inspection and Replacement of Robot Mower’s Wear Parts
Winterizing is the ideal time to inspect all wear parts of the robot mower and replace any components that may compromise performance or safety.
Blade and Cutting Disc:
- Inspect blades for wear, bending, or rust.
- Replace blades that are dull, chipped, or corroded.
- Use screwdrivers or hex keys as required, following manufacturer torque specifications.
- Clean the blade area thoroughly before reinstallation to ensure smooth rotation.
Wheels and Drive System:
- Check wheels for cracks, uneven wear, or hardened debris.
- Spin wheels manually to ensure smooth rotation; apply low-temperature bearing grease if recommended.
- Inspect drive belts or gears (if visible) for damage or excessive wear.
Chassis and Seals:
- Examine the body for cracks, loose screws, or damaged sealing points.
- Tighten any loose screws and replace worn seals to prevent moisture ingress.
Sensors and Safety Components:
- Inspect bumpers, lift sensors, and perimeter wire receivers for physical damage.
- Ensure sensors move freely and connections are clean and secure.
Tip: Document replaced parts and inspection notes for reference next season. Taking the time to inspect and replace wear parts now saves costly repairs and ensures the mower starts the spring fully operational.
Step 4 – Battery Handling and Safe Winter Storage
Proper battery care is essential to maintain performance and longevity during winter. Always follow manufacturer guidelines for state-of-charge and storage conditions.
Removable Batteries:
- Charge to the recommended level (often 40–60%) before storage. (Should check the manufacturer's suggestion)
- Remove the battery from the mower and store it in a dry, temperature-controlled environment, avoiding freezing conditions.
- Check terminals for corrosion and clean if necessary using a dry cloth or contact spray.
Integrated Batteries:
- If the battery cannot be removed, ensure the mower is powered off and charged to the recommended level. (Mammotion suggests our robot mowers charge 80% before winter storage)
- Store the mower indoors in a dry, frost-free area.
Periodic Winter Checks:
- Inspect the battery every 6–8 weeks for signs of swelling, leaks, or reduced charge retention.
- Recharge only to the recommended level if necessary; avoid overcharging.
Tip: Correct winter storage prevents battery damage, maintains capacity, and ensures a smooth spring restart.
Step 5 – Charging Station, Power Supply and Boundary Systems
Proper care of your robot mower‘s charging station and boundary system ensures reliable operation in the spring.
Charging Station:
- Disconnect from power before cleaning.
- Wipe down contacts with a dry cloth or contact-point spray.
- If possible, move the station indoors to avoid moisture exposure; otherwise, use a waterproof cover.
Power Supply and Cables:
- Inspect cables for cracks or damage.
- Ensure connectors are dry and free from corrosion.
Boundary System:
- Check that perimeter wires or sensors are intact.
- Coil excess wire neatly to prevent tangling or damage.
- Verify that all sensor connections are clean and secure.
Tip: Proper storage and inspection of these components prevent electrical faults and ensure accurate navigation when the mower restarts in spring.
Step 6 – Software, Firmware and System Backups
Maintaining the robot mower‘s software and firmware ensures the mower operates reliably after winter.
Firmware Updates:
- Check the manufacturer’s app or website for the latest firmware before storage.
- Install updates if available to prevent issues after winter.
Settings and Schedules:
- Backup lawn maps, mowing zones, and schedules via the app or by taking screenshots.
- Record any custom settings, such as blade height preferences or seasonal adjustments.
System Checks:
- Test connectivity with the app or remote control before shutdown.
- Verify that sensors and safety alerts are functioning properly.
Tip: Keeping software and settings updated and backed up minimizes troubleshooting in spring, preserves user preferences, and ensures the mower is ready for efficient operation immediately after storage.
Step 7 – Correct Indoor Storage Conditions
Proper storage protects your robot lawn mower from moisture, frost, and temperature fluctuations during winter.
Location:
- Store the mower indoors in a dry, frost-free environment, such as a utility room, insulated garage, or storage area.
- Avoid damp basements, unheated sheds, or direct floor contact.
Temperature and Humidity:
- Ideal storage temperature is generally between 5–20°C.
- Keep humidity low to prevent corrosion and electrical damage.
Placement:
- Place the mower on a stable, flat surface or shelf to avoid accidental tipping.
- Use a breathable cover to protect from dust while allowing air circulation.
Battery Storage:
- If the battery is removable, store separately according to manufacturer guidelines.
- Ensure the battery is not exposed to freezing temperatures or direct heat.
Tip: Correct storage conditions prevent damage, maintain performance, and make spring startup safer and more reliable.
Step 8 – Periodic Winter Checks for Your Robot Mower
Even in storage, regular checks help prevent battery and system issues.
Inspection Tips:
- Check battery charge and voltage every 6–8 weeks.
- Inspect for moisture, condensation, or corrosion on contacts.
- Look for rodent damage to cables or connectors.
- Verify sensors and status lights function correctly.
Tip: Performing light maintenance during winter reduces the risk of faults and ensures the mower is ready for a smooth restart in spring.
Step 9 – Spring Reactivation and Pre-Season Technical Checks
After winter storage, a careful inspection and setup ensure the mower operates safely and efficiently.
Battery and Power:
- Reinstall the battery or reconnect integrated systems.
- Fully charge the battery according to manufacturer guidelines.
- Inspect terminals and contacts for corrosion and clean if needed.
Mechanical Inspection:
- Check blades, wheels, and drive components for wear or damage.
- Ensure screws and fastening points are secure.
- Test wheel rotation manually to confirm smooth movement.
Sensors and Safety Systems:
- Verify bump sensors, lift sensors, and perimeter wire receivers are functioning correctly.
- Clean any dust or debris from sensors.
Software and Settings:
- Update firmware if required.
- Restore backed-up lawn maps, mowing zones, and schedules.
Test Run the Robot Mower:
- Perform a short supervised run without a load to check movement, navigation, and cutting.
- Observe for unusual noises, errors, or irregular movement.
Tip: Completing these checks ensures the mower starts the season reliably, prevents early failures, and maintains optimal performance throughout spring.

Professional Winter Servicing vs DIY Maintenance of Robot Lawn Mower
Homeowners have the option to perform winter maintenance robot mower by themselves or rely on professional servicing. Understanding the advantages and limitations of each approach helps make an informed decision.
Professional Servicing for Robotic Mower:
- Advantages: Full system diagnostics, electrical safety checks, battery health assessment, and manufacturer-approved service documentation.
- Best For: Robot mowers under warranty, high-end models with RTK or vision-based navigation, or units showing electrical or mechanical faults.
- Considerations: Service costs, transport logistics, and variability in service quality.
DIY Maintenance for Robotic Mower:
- Advantages: Saves cost, provides flexibility, and allows owners to closely monitor the mower’s condition.
- Best For: Routine cleaning, blade replacement, battery storage, and general winter checks.
- Considerations: Requires following manufacturer's guidelines and using proper tools.
Tip: Many European homeowners successfully combine both approaches: DIY for routine maintenance and professional support for complex or warranty-sensitive issues. This ensures safety, reduces long-term costs, and maintains optimal mower performance.
Common Robot Mower Winter Maintenance Mistakes Across Europe
Even small mistakes during winter storage can lead to costly repairs or reduced mower performance. European homeowners should be aware of the most frequent errors:
- Outdoor Storage: Leaving the mower or charging station outside exposes electronics and metal parts to moisture, frost, and corrosion.
- Improper Battery Care: Charging at very low temperatures, leaving the battery fully discharged, or storing it in damp areas can permanently reduce battery capacity.
- Skipping Cleaning: Failing to remove grass, soil, and debris allows rust and mold to develop, potentially affecting sensors and moving parts.
- Neglecting Firmware and Settings: Not updating software or backing up mowing schedules can lead to navigation errors or loss of custom settings.
- Ignoring the Charging Station and Boundary System: Moist or damaged connectors can cause electrical faults or inaccurate perimeter detection.
- Not following the supplier's recommendations: Many robotic lawn mower suppliers offer specific maintenance recommendations for their products. In such cases, targeted maintenance is required rather than following a one-size-fits-all approach.
Tip: Avoiding these mistakes ensures the mower remains reliable, reduces spring startup issues, and extends the machine’s service life across European climates.
Is Winter the Best Time to Buy a Robot Lawn Mower?
Winter is often an ideal period to consider purchasing a robot lawn mower. Many European retailers and brands, including Mmmotion, offer seasonal discounts or promotional deals during the off-season. Buying in winter allows homeowners to prepare their equipment ahead of spring, avoiding last-minute stock shortages and ensuring timely delivery.
Mmmotion offers several models suited to different garden sizes and requirements:
- LUBA mini AWD: Compact, all-wheel drive, ideal for smaller lawns and uneven terrain; easy to store and maintain during winter.
- LUBA mini LIDAR 1500: Equipped with advanced LIDAR navigation, providing precise mapping and efficient mowing patterns; excellent for complex lawns.
- LUBA 2 AWD X: High-capacity, robust model suitable for larger gardens, featuring advanced sensors and all-wheel drive for maximum traction.
Tip: Purchasing during winter allows time for owners to learn features, prepare charging stations, and plan installation before the growing season. Selecting a model that matches your lawn size and terrain ensures optimal performance and long-term satisfaction.

Summary: Robot Mower Winter Care Best Practices
Winter maintenance is key to extending the lifespan and ensuring reliable spring performance of robotic lawn mowers across Europe. Homeowners should focus on timely shutdown, thorough cleaning, inspection of wear parts, safe battery handling, and proper indoor storage. Periodic checks and software updates help prevent minor issues from becoming costly problems.
Professional servicing is useful for high-end or warranty-sensitive models, while careful DIY maintenance suffices for routine tasks. Avoiding common mistakes—such as leaving equipment outdoors, skipping cleaning, or neglecting updates—ensures optimal performance.
Frequently Asked Questions
1. How to winterize a robot lawn mower?
Winterizing a robotic mower involves cleaning the unit thoroughly, inspecting and replacing worn parts, handling the battery according to manufacturer guidelines, updating software or firmware, and storing the mower in a dry, frost-free environment. Periodic checks during winter help prevent minor issues from becoming major problems.
2. What to do with a robot mower in winter?
During winter, you should switch off the mower when grass growth slows, clean all debris, remove or safely store the battery if possible, inspect blades and wheels, update software, and place the mower in a protected, indoor location to avoid frost and moisture damage.
3. How to store a robot mower for winter?
Store the mower indoors in a dry, frost-free area such as a utility room or insulated garage. Place it on a stable surface, cover it with a breathable cover, maintain proper battery charge levels, and ensure all connectors and sensors are clean and dry.
4. Can robot mowers cope with leaves?
Robotic mowers can handle small amounts of dry leaves, but thick layers or wet leaves can clog blades and sensors. It’s best to clear excessive leaf buildup before mowing or use a rake or blower to remove leaves prior to operation.
5. Should you take the battery out of your lawn mower for the winter?
Yes, if your mower has a removable battery, it should be removed and stored in a dry, temperature-controlled environment, typically at 30–60% charge. For integrated batteries, ensure the mower is powered off and kept in a frost-free location.
6. How often should I check my robotic mower during winter?
Perform light inspections every 6–8 weeks, checking battery charge, moisture, corrosion, and cable or sensor condition to prevent issues before spring.
7. Do I need professional servicing for winter maintenance?
Professional servicing is recommended for high-end models, warranty-sensitive units, or complex navigation systems. DIY maintenance is generally sufficient for routine cleaning, blade replacement, and battery care.
8. Can I leave my charging station outdoors during winter?
It is best to store the charging station indoors. If outdoor storage is unavoidable, use a waterproof cover and ensure connectors are dry and corrosion-free.
9. Should I update firmware before winter storage?
Yes, updating firmware and backing up lawn maps and schedules before storage ensures smooth operation and prevents configuration loss in spring.
10. Is winter a good time to buy a robotic lawn mower?
Winter can be an ideal time to purchase. Brands like Mmmotion often offer big promotions, allowing homeowners to prepare ahead of the growing season with models suited to small and large lawns.
Leave a comment
This site is protected by hCaptcha and the hCaptcha Privacy Policy and Terms of Service apply.